
Baking Bread 101: How To Make A Sourdough Starter Recipe
When COVID-19 came to rear it's ugly head around the world, the entire world has finally realized that bread is the number one comfort food... The store shelves were stripped bare of flour, yeast, and sugar... Everyone returned to their more primitive instincts... baking. Here's a foolproof easy to make sourdough starter recipe.
So what exactly is a "sourdough starter" and why do you need it? Simply put, a recipe for sourdough starter is a live bacterial culture of flour and water. Once brought together, the magic begins to happen, the culture will ferment with the natural yeasts found in the air. A small portion of the sourdough starter recipe is then added to your bread dough to make it rise.
The best part is when using a sourdough starter bread recipe... That prized and really hard to find right now commercial yeast isn't needed!
This is a multi day, time consuming process. But... it's SOOOO worth it. Just remember that once your starter is alive, keep it cared for and fed, and over the years, you will continue to be able to produce some of the most delicious homemade bread on the planet!
Sourdough Starter Recipe: Step By Step
Ingredients For A Sourdough Starter Recipe:
- A sterilized Ball Jar (of at least 25oz capacity)
- 1 5lb bag of unbleached all purpose flour
- 1/2 cup of wheat or rye flour (I prefer rye)
- Bottled Spring or Distilled Water (no tap water!!)
Pro Tip: This is the time to SKIP the organic flour, organic flours have a different enzymatic make up and can often not produce the desired rise that you want.
Sourdough Starter Day 1:
Mix together 1/2 cup of the whole wheat or rye flour, and 1/4 cup of water in the jar. Mix it well with a fork until smooth. You want to look for a thick and pasty consistency. Cover the jar opening loosely with a clean tea towel. Place the jar in a warm area (75-80ish degrees F) for a minimum of 24 hours. (I put mine on top of my fridge).
Sourdough Starter Day 2:
Today's task is to check for bubbles. You want to look at the surface of your starter and see if any bubbles have formed. It's totally ok at this point if you don't see very many bubbles, or any at all in fact! The bubbles might have came up and gone away while you weren't looking or you were asleep. You don't have to do anything more at this point for another 24 hours. So go pour yourself a glass of wine... It's happy hour somewhere!
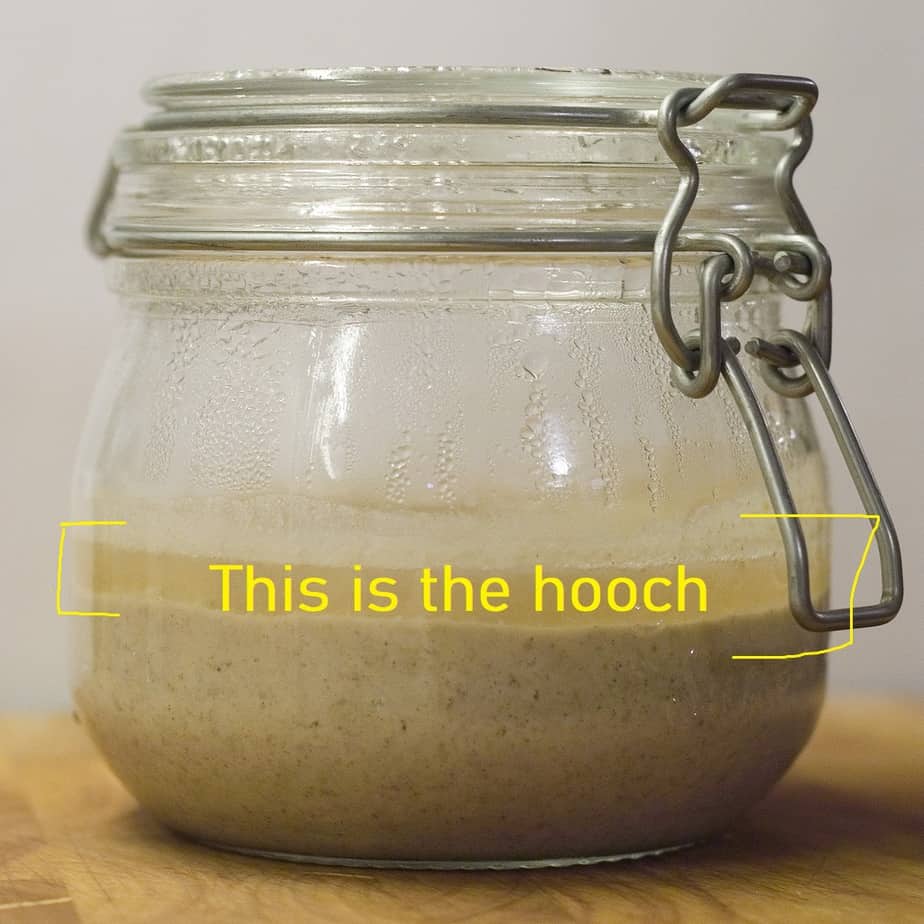
During the creation of your starter, you may see a darkish liquid that might appear on the surface of your starter. This liquid is known as "hooch" or a fermentation bi-product. This liquid has a very stinky smell, similar to corked wine, gym socks, or rubbing alcohol. Anytime you see this liquid, it needs to be removed, along with any of the started that has discolored itself. Once you smell it, you will know.. it's just plain nasty!
Sourdough Starter Day 4:
Strap on the feedbag! Today it's feeding time. If you have bubbles or not, it's time to begin feeding your starter. So let's jump in! Remove your starter from the jar, into a clean large bowl, and discard half of it. (Sorry, yes...) The texture of your starter should be stretchy at this point.. It's always fun to play with the stretchy mixture a touch..
The texture you are looking for is thick pancake batter or that of Greek Yogurt. Add more water as needed if your starter is too thick. Mix in your 1/2 cup AP flour & 1/4 cup water for feeding. Mix together, and then return your starter back to the jar.
At this point you want to put your jar into a clean high sided deep bowl. Just in case your starter takes off on you.. You don't want to wake up to a huge mess to clean up. Cover again loosely, and let it rest in your warm spot for another 24 hours.
Sourdough Starter Day 5:
Keep Feeding! Repeat the day 3 method... Remove and discard half of the starter, and any hooch or discolored starter that may have formed. Feed it with 1/2 cup of the AP flour, and another 1/4 cup of bottled water. As the natural yeast begins to develop, your starter will begin to rise. Bubbles will form all over the culture. Keep watching it, and over time it will fall again. That's your indicator that your starter must be fed again!
Pro Tip: Put a piece of masking tape on the outside of the jar after adding the flour and water mixture.. This will be your level indicator to check to see how the starter is progressing during it's rise.
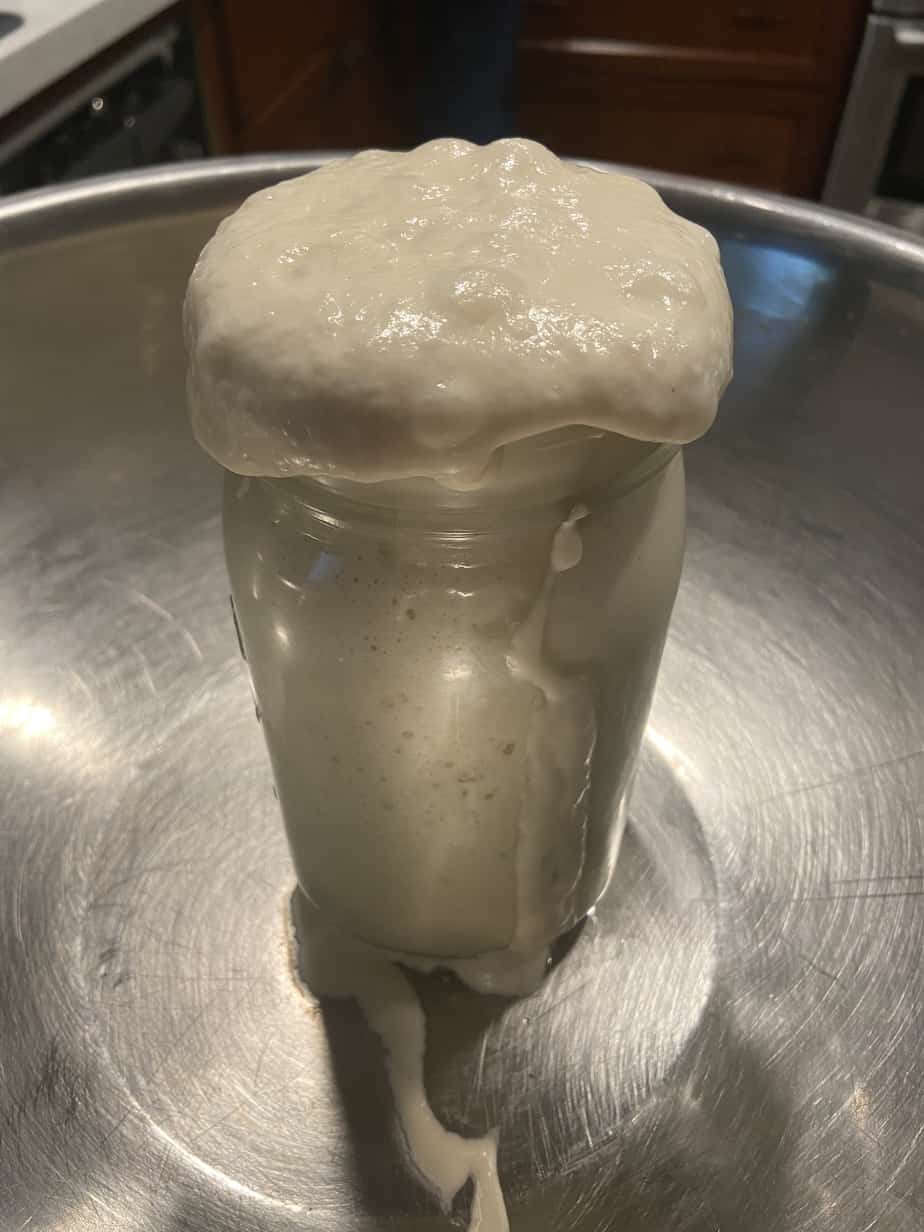
Day 7: A STARter IS BORN!
At this point, your sourdough starter should have doubled in size. You should have plenty of visible bubbles, both small as well as large bubbles. The texture of the starter should be fluffy and spongy, similar to marshmallow fluff. It should smell pleasantly yeasty... and not like stinky gym socks or rubbing alcohol.
Starter itself is very fickle and can respond differently due to temperature, the type of yeast in your environment, and any possible contaminants (such as you not following the rule of using bottled or distilled water). Just remember that it should always be bubbly and look happy,
Next you want to transfer your starter to a new clean jar. And you need to name it! We called ours Emilio Yeastevez.
How to Care for Sourdough Starter:
Starters have to be cared for! Just like anything that is alive, or that Tomagachi that you left in the drawer when you were a kid... you need to maintain regular feedings of your starter to keep it happy and living. In order to do this, you're simply going to repeat what you did on day 3. Remove and discard half of the starter, replenish the starter with bottled water and 1/2 cup of flour.
Cover it loosely and let it rise at room temperature until bubbly and the volume has doubled. Once it falls on it's own... it will need to be fed again. If you are a heavy bread baker, keep your starter at room temperature going forward, and feed it daily. If you are a hobbyist, then place it in the fridge to retard the growth, and only feed it once a week.
If you accidentally forget to feed your starter... All is not lost.. It may look like hell, and smell nasty... but it just needs a few more daily feedings to make it happy and bubbly and yeasty smelling again. Always remember to remove discolored hooch and starter during your feedings!
Check Out Some Of Our Other Tasty Recipes, Tips & Tricks!
- Ready in 1 Hour Pumpkin Spice Bread Pudding Recipe
- 4 Top Secret Ingredients in a Master Chef's Pantry
- How Long Should I Keep Cooked Fish in the Fridge?
About the Author: Chef Sean Andrade is a Certified Master Chef, Sommelier & Wine Educator, and chef-owner of AWG Private Chefs. With over 25 years of experience in the food and beverage industry, Chef Sean has traveled all over the globe to learn, taste, source ingredients, and develop recipes.